Minisleep: a tiny wiki engine
This part of my website use Minisleep,
a lightweight wiki engine which is probably my favorite wiki/blog
engine due to its overall simplicity and elegance.
Here is a list of its features:
- small (<1000LOC) and with almost zero dependencies (it depends on core features of many Unix systems) so easily understandable and extendable
- very simple on the user side, only provide the necessary to write content (WYSIWYG editor, easy page creation and edition)
- ridiculously simple on the backend side (no database, no
daemon, very easy administration and migration due to being
filesystem based, single CSS script for theming, single
page template)
- optional graphical page editor with drag-and-drop image
support, can support different markup languages (like
markdown)
- statically compiles pages to HTML files
- it make minimal use of JavaScript (WYSIWYG editor make use of a
few lines of JavaScript)
- it is easy to setup (documentation / setup guide available) with pretty much zero config to do
- customizable, you can build pretty complex stuff with it
if you want to push it further
What i like the most with Minisleep is the simplicity
by which you can write content which is probably the most
important thing for a website / blog / wiki !
Content can also be written with any editors as it is
just a set of files on disk. Content can also be written in
different markup languages, some like markdown are right away
supported and all of them except HTML use a CLI program to do all
the work (so Minisleep doesn't do anything! it just call the
program which generate the HTML code and that is
it)
For small / minimal text-focused personal websites /
blogs / wiki i think it is a great solution.
On the technical side it is not very modern and a bit hacky as
it use plenty "obsolete" technologies such as : HTTP basic
authentication, a tiny bunch of Shell scripts, CGI,
WYSIWYG that use deprecated features so it is only completely
usable in Firefox.
Images can be drag and dropped in the
WYSIWYG editor and it just works without the
need to upload it, it is embedded as data. The disadvantage of that
is that you don't have much options (such as image title, rescaling
etc) so it is a bit primitive compared to more complex solutions.
Another huge disadvantage is that content is embedded into the HTML
so pages can become quite heavy which is probably why it is not
adapted to media-focused content by default.
If you lack some stuff in the WYSIWYG
editor you can just add it pretty easily if you did a bit of a web
development. There is no fluff here, it just obey to the KISS
principle.
It is secure because it remains simple without much
attack surface, if you are afraid of the HTTP basic
authentication side you can disable all of it in five minutes so it
become a 100% static website.
It rely on few dependencies, if you install it on your
own server you must have:
- Linux or any other Unix with a POSIX shell and GNU coreutils or equivalents (head, tr, cat, cut, sed, realpath, touch)
- HTTP webserver that supports CGI such as lighttpd
On the meh side for larger websites:
- not adapted for large public Wiki, there is no accounts
creation, accounts must be created on the server side, there is
also no conflicts resolution, it just lack many features of the
bigger frameworks
- not really adapted if you need complex / modern features (unless you want to implement them) such as comments, SEO etc., better go on something like WordPress for this
- you cannot delete pages as of yet (no interfaces to do that), it is however easy to just remove the directory on the filesystem
- no support for table or layout stuff in the HTML WYSIWYG
editor, can be seen as a bit primitive :)
- WYSIWYG generated code with HTML markup is bit ugly (easily
modifiable by plugging a CLI program that tidy it up)
But overall for documentation / small community sites /
personal website / blog it is awesome and i recommend it if you dig
simple and elegant solutions.
Multiple Minisleep could also work for different parts of a
website, it is probably lightweight enough to never become a
maintenance hell.
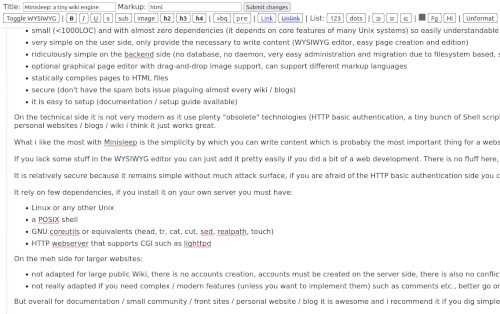
The WYSIWYG editor (a bit
customized) in action with the essentials !
Tricks
Since all page paths use the filesystem (no databases here) if
you did a naming mistake while creating a new page you can easily
reverse it by renaming the faulty directory in public
directory, you may have to rebuild the page through the admin
tool so the edit button work again.
Most page related update issues (like the above) can also be
resolved easily by running the rebuild_all_pages.sh shell
script in minisleep/scripts directory.
Revisions can be disabled within the
config.iniThe menu and all pages (like adding a back to top
button) can be modified easily by editing :
minisleep/scripts/buildpage.shAs for security you may entirely lock your website as
just a set of static content by disallowing (or moving elsewhere)
the CGI script located here :
minisleep/docs/lighttpd/public_html/cgiWYSIWYG hack
The bundled WYSIWYG editor use a very basic (and a bit
outdated albeit still supported) set of web technologies with
minimal amount of JavaScript, the advantage is that you can easily
hack it to add your own custom buttons which you may want to apply
things such as CSS classes to your content. For examples, all the
headings here use a CSS class which is automatically applied to the
parent element when h2, h3, h4 button is clicked.
Here is how to add a button that toggle a CSS class to the
element in the WYSIWYG editor:
- edit
minisleep.cgifile inminisleep/scriptsdirectory and locate the list of <button> - add your button by adding a line:
<button type='button' onclick=\"getSelection().anchorNode.parentNode.classList.toggle('your_css_class_name');\"> your_button_name </button> - save the file and enjoy your new button in the WYSIWYG editor
For some reasons i also needed to patch the h2, h3, h4 buttons
to make them work (they probably used JavaScript code which was not
supported in Firefox), the fix is easy:
- edit
minisleep.cgifile inminisleep/scriptsdirectory and locate the <button> tag of the h2, h3, h4 - replace each lines with this code (rename h2 by the correct
one):
<button type='button' onclick=\"execCommand('formatBlock', false, 'h2');\" style='font-weight: bold;'> h2 </button> - save the file and enjoy the working h2, h3, h4 buttons in the WYSIWYG editor
<button type='button'
onclick=\"var
code=document.createElement('code');getSelection().anchorNode.parentNode.appendChild(code);code.innerText='some
code';\"> code </button>
Lastly, if you want to add a code block you may want to add a
line :
<button type='button' onclick=\"var
code=document.createElement('code');code.className='code-block';getSelection().anchorNode.parentNode.appendChild(code);code.innerText='some
code';\"> code block </button>
then you can add a
class code-block in your CSS to style the code block.The only issue with the code block button above is that
pressing the ENTER key inside the code block will append a new DIV
which will mess things up if you have styling (and produce horrible
code), i solved that by overriding the ENTER key when it is
detected in the code-block:
function overrideEnter(e){

    var anchorNode = getSelection().anchorNode;

    if (e.key === 'Enter' &&
(anchorNode.className === 'code-block' ||
anchorNode.parentNode.className === 'code-block')) {


document.execCommand('insertHTML', false, '<br>');

        e.preventDefault()

    }

}


document.getElementById('editarea').addEventListener('keypress',
overrideEnter);
The code above needs to be added to the function
check_if_markup_is_html (function which is called when
page is fully loaded)If you add more complex custom elements you may have
to hack some code like the one above if things get funky in the
WYSIWYG editor.
The WYSIWYG may act funky at times but never get in
your way too much if you stay to simple stuff.
Solving the WYSIWYG embedded data issue
The Minisleep HTML WYSIWYG editor is great but all images /
videos added by drag and drop are embedded as inline data into the
pages. It works if you have small amount of such content / all
medias are lightweight but may be troublesome with many / heavy
data, i once had a static page of about 30MB due to a mix of MP4 /
GIF / PNG / JPEG.
The way i solved it is by writing a small Node.js CLI tool which parse the HTML,
extract the data and replace all inline data elements (PNG, JPEG,
GIF, MP4) with their URL equivalent when you submit a page. This
tool only use the default libraries and is easily plugged into
Minisleep:
// htmlProcessor.js

// Usage: node htmlProcessor.js inputFile outputFile

const path = require('path')

const fs = require('fs')


const args = process.argv.slice(2)


const inputHtmlFilepath = args[0]

const outputHtmlFilepath = args[1]


const inputDirectory = path.dirname(inputHtmlFilepath)


// directory where extracted images go (always relative to input
directory)

const outputSubDirectory = 'images'

const outputDirectory = path.join(inputDirectory,
outputSubDirectory)


// create output directory if it does not exist

if (!fs.existsSync(outputDirectory)) {

    fs.mkdirSync(outputDirectory, { recursive: true
})

}


// empty output directory

console.log('Cleaning up output directory...')

const items = fs.readdirSync(outputDirectory)

items.forEach((item) => {

    const filepath = path.join(outputDirectory,
item)

    if (fs.lstatSync(filepath).isFile()) {


fs.unlinkSync(filepath)


        console.log('Cleaning
up... ' + filepath)

    }

})


console.log('Parse HTML...')


fs.readFile(inputHtmlFilepath, 'utf8', (err, data) => {

    if (err) {

        return
console.log(err)

    }


    let dataStr = data.toString()


    const inlineData = []


    // extract inline images

    const inlineDataRegex =
/<img.*?data:(.*?);base64,(.*?)"\s.*?>/g

    const inlineDataRegexProcessor = new
RegExp(inlineDataRegex)


    let match =
inlineDataRegexProcessor.exec(dataStr)

    while (match !== null) {

        const tag = match[0]

        const mime =
match[1]

        const b64data =
match[2]


        inlineData.push({


tag: tag,


mime: mime,


b64data: b64data

        })


        match =
inlineDataRegexProcessor.exec(dataStr)

    }


    console.log('Parsing done... ' +
inlineData.length + ' inline data found')


    let index = 0


    inlineData.forEach((item) => {

        const tag = item.tag

        const mime =
item.mime

        const b64data =
item.b64data


        const decodedData =
Buffer.from(b64data, 'base64')


        let ext = ''


        // write corresponding
file for each detected MIME type

        if (mime ===
'image/png') {


ext = '.png'

        } else if (mime ===
'image/gif') {


ext = '.gif'

        } else if (mime ===
'image/jpg' || mime === 'image/jpeg') {


ext = '.jpg'

        } else if (mime ===
'video/mp4') {


ext = '.mp4'

        } else {


console.log('Unknown MIME type: ' + mime)

        }


        const outputFilename =
index + ext


        if (ext === '.mp4')
{


// in this case the browser WYSIWYG seems to produce a .gif of the
.mp4 by itself so we just remove the mp4 tag and let the gif tag be
processed


console.log('strip tag...')


dataStr = dataStr.replace(tag, '')

        } else if (ext) {


const outputFilepath = path.join(outputDirectory,
outputFilename)


console.log('write... ' + outputFilepath)


fs.writeFileSync(outputFilepath, decodedData)


const imagePath = path.join(outputSubDirectory, outputFilename)


// replace HTML tag by the 'external resource' equivalent tag


console.log('replace tag...')


dataStr = dataStr.replace(tag, '<img src="' + imagePath +
'">')


index += 1

        }

    })


    console.log('write HTML... ' +
outputHtmlFilepath)


    fs.writeFile(outputHtmlFilepath, dataStr, (err)
=> {

        if (err) {


return console.log(err)

        }

    })


    console.log('done')

})
Not a perfect solution as this add a dependency (could be done
with OS tools as well) but it was lightweight enough for my use
case.
If you have some other unsupported content you can add it in
the mime type detection part. MP4 are actually ignored because they
are also embedded as a GIF on drag and drop so i ignore them and
let the script extract the GIF instead.
To plug it with Minisleep you just have to edit
script/buildpage.sh and replace the
html) markup case with:
html)


node /path/to/htmlProcessor.js ds_temp_pre ds_temp_post_1


tidy --quiet true --clean true --show-body-only yes ds_temp_post_1
> ds_temp_post || true


;;
I also added HTML tidy tool to clean the HTML. Remove
the third line and replace ds_temp_post_1 by
ds_temp_post if you don't want to use tidy.
With this fix the WYSIWYG content will remain with
embedded data (so there is no changes at all on the default
behavior) but all data will be extracted into an images
directory (relative to the page directory) when you submit any
changes. The generated page will contain no embedded data thus
solving the issue completely.
Note: The script clear the images directory
every times the page is built again.
Content table
I also added a way to generate a content table by adding these
lines to my htmlProcessor.js just before "write HTML..."
line, this just add a bunch of id="" to h elements and generate the
content table at the position of [YOUR_TAG] :
    const
contentTableHookTag = '[YOUR_TAG]'

    // generate table of contents if necessary

    if (dataStr.includes(contentTableHookTag)) {

        const contentTableData =
[]


        const contentTableRegex
=
/\<h(1|3|4){1}.*?\>([\w\W\s]*?)\<\/h(1|2|3|4){1}\>/g


        const
contentTableRegexProcessor = new RegExp(contentTableRegex)


        let contentTableMatch =
contentTableRegexProcessor.exec(dataStr)

        while (contentTableMatch
!== null) {


const tag = contentTableMatch[0]


const hType = contentTableMatch[1]


const text = contentTableMatch[2]


contentTableData.push({


tag: tag,


hType: hType,


text: text.trim()


})


contentTableMatch = contentTableRegexProcessor.exec(dataStr)

        }


        console.log('Content
table parsing done... ' + contentTableData.length + ' headers
found')


        const ids = new
Map()

        let contentTable =
'<ul>'


        let h3 = false

        let h4 = false


contentTableData.forEach((item) => {


const tag = item.tag


const hType = item.hType


const text = item.text


// add id="..." to headers tag


console.log('generate ID...')


let formattedText = text.replace(/\<br\>/g,'').replace(/\"/g,
'')


let id = formattedText.replace(/\s/g, '_')


if (ids.has(id)) {


const value = ids.get(id)


id += '_' + value.length;


value.push(id)


} else {


ids.set(id, [])


}


dataStr = dataStr.replace(tag, '<h' + hType + ' id="' + id +
'">' + text + '</h' + hType + '>')


console.log('generate summary content...')


if (hType === '3') {


if (h4) {


contentTable += '</ul>'


}


if (h3) {


contentTable += '</li>'


}


h3 = true


h4 = false


contentTable += '<li><a href="#' + id + '">' +
formattedText + '</a>'


} else if (hType === '4') {


if (h3 && !h4) {


contentTable += '<ul>'


}


h4 = true


contentTable += '<li><a href="#' + id + '">' +
formattedText + '</a></li>'


}

        })


        if (contentTable.length
> 4) {


if (h4) {


contentTable += '</ul>'


}


if (h3) {


contentTable += '</li></ul>'


}


console.log('Generating content table...')


dataStr = dataStr.replace(contentTableHookTag,
'<h3>Contents</h3>\n' + contentTable)

        }

    }

    //
Conclusion
Another drawback of Minisleep is that some web
technology may become obsolete later on... so things such as the
WYSIWYG editor may become dysfunctional... i don't care much though
because it will be probably be simple to make it work again.
The WYSIWYG editor may also produce ugly code in HTML
mode and it is difficult to add media metadata unless you don't
care or add them manually. May be better to stay away from HTML and
use markup languages instead unless you use a CLI tool like
tidy although i also had
infinite loops with tidy tool due to some badly generated HTML
so... don't trust tools !
There is plenty similar static website generator but
most of them were too heavy for me or they don't have the WYSIWYG
part, i just happen to be in sync with Minisleep concept and tech
which solve my needs.
To conclude i wish i didn't write my website as a set
of static pages (which became a bit hard to maintain) and used
Minisleep instead, it just feels better to write content (nothing
in your way!) and is still simple enough that you can migrate or
backup all your website quickly. It is also pretty easy to rewrite
in whatever language if there is any needs to that. Ace!
back to top
