Writing a small Forth-based RPI OS : Part 1 (Das U-Boot baremetal usage to ease I/O)
This focus on U-Boot setup, see part 2 for a low level Forth dialect implementation. Loosely related to my Moving to lower tech article.Contents
- Introduction
- Simplifying OS I/O :
U-Boot on Raspberry PI
- I/O issues on the PI
- U-Boot alternatives ?
- Compiler setup
- SD card setup
- PI proprietary blobs and copy to boot partition
- U-Boot setup for Raspberry PI Zero 1.3
- U-Boot > v2024.04 bug on old Raspberry PI
- U-Boot OS boot script
- SD card boot partition content
- U-Boot customization, disabling cache, faster boot process
- U-Boot exported functions usage
- U-Boot API usage
- Extending the U-Boot API
- U-Boot storage / network access
- U-Boot frame-buffer access (graphics)
- Note on U-Boot memory layout
- U-Boot USB keyboard handling
- Change frame-buffer resolution (RPI 0)
- Debugging ARM / U-Boot code
- What is next ?
Introduction
I had an interest in writing a hobby
operating system and programming language from scratch for a
while but i was often deterred by the inherent complexity of
such projects, my ideas were slightly more aligned with
low-level code golf programs without being too cryptic, aiming for
simplicity in implementation, small but still easy to use like the
old-school CP/M or
ROM
bundled OS of the early 80s (C64, Jupiter Ace etc.),
the point was not to replicate any "modern" OS features at all and
ignore most features a modern CPU provides. (modes etc.)
This is a series of articles that show how i built my own
minimalist bare-metal operating system in ARM
assembly on top of U-Boot for a
Raspberry PI Zero 1.3 based on Forth.
(especially colorForth)
This article is mainly about the preliminary setup of the OS
on the chosen platform using Das U-Boot to ease
I/O on a Raspberry PI and avoid modern low level complications.
(USB etc.)
Note : All ARM
code in this series use a subset of the target architecture ARM
instruction set, this subset relate to the early late 80s ARM CPUs
which i am fond off, i don't make use of newer instructions.
Hardware
The target hardware for this OS is a Raspberry PI Zero 1.3 (single-core ARM1176JZF-S CPU), the OS code use U-Boot API to simplify I/O, the PI Zero was chosen because i had one around and had prior experience with ARM on the Acorn Archimedes and i quite like RISC and PI "minimalist" set of features especially centered around a mid to late 90s design single-core which is not too common nowadays.Why Forth ?
Here is a compact summary of what is Forth (from Wikipedia)
:
Forth typically combines a compiler with an integrated command shell, where the user interacts via subroutines called words. Words can be defined, tested, redefined, and debugged without recompiling or restarting the whole program. All syntactic elements, including variables, operators, and control flow, are defined as words. A stack is used to pass parameters between words, leading to a Reverse Polish Notation style.
A Forth implementation is algorithmically simple with few core
concept, it is incredibly flexible yet simple to implement, a
straightforward implementation sit between machine code and high
level languages, i think it serve as a great introduction to the
inner working of programming languages as it share many base
constructs and can easily grow towards high level constructs
without huge structural changes.
It was rather natural to go for a stack-oriented programming
language such as Forth with my requirements, it was straightforward
to understand and it somehow directly works like a minimal
operating system / language combo on some implementation, it
doesn't try to hide the low-level stuff but provide a thin layer
which makes Forth a popular language choice in resource-constrained
environments such as the embedded world for debugging and other
purposes due to its adaptability and simplicity / features ratio,
the implementation can go incredibly minimal, example of Forth
usage in the wild is eg. Open Firmware or
HP
RPL.
There is some high level alternative to Forth as a programming
language such as Scheme
/ LISP,
Factor,
Tcl, Joy
or Kitten, some of them do a
great job at abstracting the low level stuff away, some of them are
typed, they can be small to implement but may require more effort
for a good result.
This
talk by Jon Purdy is a great starting point to understand the
foundation of concatenative
programming language and how they can be extended to add a type
system, also see
this article and this.
My Forth started as a minimal
implementation but i directed it towards higher level
constructs for convenience (and exploration) such as built-in
variables, high order
functions support etc. it was fun to realize how flexible Forth
can be while being still tiny, it can be close to the machine or
something as practical as C or as high level as LISP
(see Joy)
although LISP may be more cohesive and uniform in its
approach.
Forth in a nutshell
A typical Forth interpreter have two stacks
(a data stack and a return stack), a context state (compile or
immediate), a dictionary (a linked list
usually) which hold the words and associated data
such as code, the syntax of the language is just a composition of
words (printable characters) delimited by space, each words
can be seen as a subroutine which do some actions such as calling
other words or manipulate the stacks, it is akin to a virtual
machine.
To be useful as a language a Forth have a base dictionary made
of primitives, they are predefined words (such as
operators like + * ) by which other words are
composed of, among the primitives there is special primitives such
as : which switch the Forth context into "compile" mode and
allow to define a new word which is added into the words list along
with the code (other words) it is composed of, ; close a
definition and switch to "immediate" mode.
Words also have a binary state which mark some of them to be
evaluated directly inside definitions instead of being put among
the definition words, this is useful for high level constructs such
as conditionals, ; is such word for example since
it must be evaluated instead of being added to the definition
code.
It is equally simple to go from a Forth interpreter to a
compiler producing efficient generated code due to easy inline
expansion of words code (especially when STC
model is used), primitives can also be optimized for the target
architecture as needed which may result in good performances by
default (better than non optimized C) with a naive implementation,
Forth stack based scheme still limit what is possible to reach
naively on a register based machine though.
More details on Forth can be found here.
Also see my preliminary
Forth prototype article which show a high level implementation
of Forth.
colorForth (tokenized
Forth)
colorForth is a
stand-alone tokenized dialect of Forth with colors, it also come
with OS-like features, it completely deviate from the popular
ASCII-based separators (text based) languages and instead use a
binary format with a colorful presentation. It is akin to a
visual programming approach and also close to tokenized
languages of the 80s such as BASIC although the main goal back then
was mostly a space saving one.
Main advantage of ColorForth to me is the simplification of
the parser code even for higher level constructs, adding features
to the language does not increase much the parsing complexity, it
is an efficient approach for languages like Forth because they
already tend towards a limited syntax with few base elements.
Another advantage is that syntax highlighting come naturally from
its design !
ColorForth require different tooling but a basic hexadecimal
editor with different layers is perhaps sufficient, the popular
approach is to switch a word type through keyboard shortcuts.
I was heavily interested in colorForth from the start so one
of my goal is to shape the OS towards it as colorForth concept
fulfill my needs.
Rainbow Forth; a
colorForth implementation
Simplifying OS
I/O : U-Boot on Raspberry PI
An ARM implementation was the next step but some issues came
quickly to my mind : how do i handle all the I/O stuff such as
keyboard input, storage access and graphics at low level on a
Raspberry PI ?
Below is a step by step guide which show the process to setup
U-Boot on a Raspberry PI Zero 1.3 to load my custom ARM code with
U-Boot API calls to easily handle I/O and ease portability, the
sole idea was to cut out all the complicated modern hardware
bits... (keyboard, storage, graphics)
Note that i chose to do the bootstrap code in ARM assembly
instead of C but U-Boot features usage would be way more robust /
easier in C !
I/O issues on the PI
Turns out that while it is simple to draw
graphics at low level on a Raspberry PI, handling a keyboard is
considerably harder due to having to deal with USB which has a
"tedious" implementation, storage is roughly the same, the grunt
work and time required to do an implementation didn't satisfy me so
i looked for workarounds.
An easy although hacky solution for the keyboard interface was
to plug a
PS/2 keyboard to the PI GPIO which is easier to deal with,
there is also the UART road, this
didn't solve storage though and i wanted a standalone
approach.
There is several bare metal environment for the PI with
various I/O implementation such as circle that i could borrow
from but i was looking for something easier, BIOS-like.
The I/O complexity issue wouldn't be a problem on x86
platforms (as long as ones stay in real mode) due to the
BIOS (or UEFI nowadays) which can
be considered a form of pre-OS, the BIOS firmware among other
things provide a "nice" interface to the hardware that the
operating system can use to simplify its I/O so that there is no
drivers to write, modern OS don't use the BIOS much because it can
only be accessed in real mode and it was replaced by UEFI, it is
still useful for a simple hobby OS, too bad that the Raspberry PI
doesn't have this sort of feature for various reasons.
My solution was to add a hardware abstraction layer through
the usage of Das
U-Boot which is a flexible boot loader that provide an API as
well, it also has UEFI features which enable a portable way to do
I/O, UEFI has some more requirements such as binary format so i
didn't try it yet but the portability aspect is interesting.
Note that the PS/2 solution is still worthy as a cheap way to
get a PS/2 mouse
working. (U-Boot doesn't have a mouse interface out of the
box)
As for audio, U-Boot doesn't have any support for it (a
guess), HDMI / USB audio can be used but the interface may be
complicated, an alternative is
PI GPIO.
It was funny to unveil all these software layers
since they can be considered pre-OS already for all the features
they provide... and adding U-Boot adds so much already... this
stack looks a bit "ugly" i guess but all this complexity is perhaps
necessary to deal with plenty hardware bits and accommodate special
use cases in a reliable way (such as my own here !), it would be
much simpler (in term of layers) with a tightly coupled "custom"
hardware or on some other platforms. (retro ones ?)
U-Boot alternatives ?
U-Boot was one choice but alternative exists (they may be
simpler !) such as Barebox or Coreboot
/ Libreboot.
(don't know if the last two support the PI Zero though)
Compiler setup
On Ubuntu 22.04 to compile my OS code and U-Boot :
sudo
apt-get install gcc-arm-linux-gnueabihf
SD card setup
The SD setup below create a ~30MB FAT32 boot partition on a
formatted SD card, replace sdx below by your SD
card device name :
sudo parted -s /dev/sdx \ mklabel msdos \ mkpart primary
fat32 1M 30M
sudo mkfs.vfat /dev/sdx1
The size of the boot partition is arbitrary and can be smaller
but beware of very small boot partition as i had issues with a ~8MB
one which couldn't boot for some reasons although it could hold all
the files.
PI
proprietary blobs and copy to boot partition
- clone repository :
git clone --depth 1 https://github.com/raspberrypi/firmware - copy
firmware/boot/bootcode.binto boot partition - copy
firmware/boot/fixup.datto boot partition - copy
firmware/boot/start.elfto boot partition
U-Boot setup for
Raspberry PI Zero 1.3
- see U-Boot documentation to install U-Boot the various
dependencies required to build
- clone U-Boot project :
git clone https://source.denx.de/u-boot/u-boot.git - switch to a stable release :
git checkout tags/v2024.04 - a U-Boot
defconfig file is available for that PI board at
configs/rpi_0_w_defconfig directory, in order to be able to
boot on RPI 0 i had to replace the default
CONFIG_DEFAULT_DEVICE_TREE= line by this one :
CONFIG_DEFAULT_DEVICE_TREE="bcm2835-rpi-zero" - use / write configuration file :
CROSS_COMPILE=arm-linux-gnueabihf- make rpi_0_w_defconfig - enable U-Boot API in General setup of the
configuration tool (don't forget to save) :
CROSS_COMPILE=arm-linux-gnueabihf- make menuconfig - compile U-Boot :
CROSS_COMPILE=arm-linux-gnueabihf- make -j$(nproc) - a
u-boot.binfile should be available in the project directory, this file must be copied to the boot partition and renamed tokernel.img
For some reasons (lacks of serial connection ?) the
autoboot was always interrupted in my case... so i needed to set
the autoboot delay to -2 in U-Boot menuconfig : Boot options
> Autoboot options
To use u-boot.bin file without renaming a
config.txt must be created on the boot partition (this
configure the PI boot) with this content :
kernel=u-boot.bin
At this point the PI should boot to the U-Boot shell which
provide a way to interact with U-Boot tools, next step is to bypass
this by telling U-Boot to load the OS binary somewhere and jump to
its code.
U-Boot >
v2024.04 bug on old Raspberry PI
U-Boot releases after v2024.04 (git tag) didn't work on my PI
due to a bug introduced
in this commit, this bug probably break some old Raspberry PI
as well.
If you get this issue on your board either revert the commit
or apply this fix :
- edit file
arch/arm/Kconfig - search for "ARCH_BCM283X"
- remove "imply OF_HAS_PRIOR_STAGE" line
- re-build :
export
CROSS_COMPILE=arm-linux-gnueabihf- make clean && make
rpi_0_defconfig && make -j$(nproc)
It may be safer to revert the commit since there was other
changes that may break ARM64 boards.
U-Boot OS boot script
A U-Boot script must be created in order to boot a custom OS
automatically, here is the content of my script (called
rpi_0.cmd) :
fatload mmc 0:1 ${kernel_addr_r}
gnos.bin

go ${kernel_addr_r}
This load the OS binary contained in gnos.bin and jump
to its code.
The boot script must be converted to another format before
copying it to the SD with :
mkimage -C none -A arm -T script
-d rpi_0.cmd boot.scr
Then boot.scr must be copied to the boot
partition.
The manual U-Boot command that execute this script on the
U-Boot prompt is :
bootflow scanSD card boot partition content
All the content of my SD card after this setup,
config.txt is not mandatory and is used to boot
u-boot.bin directly instead of renaming it to kernel.img :

U-Boot
customization, disabling cache, faster boot process
The U-Boot configuration tool menuconfig can be used to
add or remove U-Boot features, this can be useful to customize the
boot process and have both a lightweight binary and a faster boot
process.
My U-Boot configuration was tailored for boot speed and i
removed a lot of unused bits to make it minimal, to avoid redoing
the configuration with menuconfig i copied the
rpi_0_w_defconfig file and appended my own config
:CONFIG_BOOTCOMMAND="usb start;fatload
mmc 0:1 ${kernel_addr_r} gnos.bin;printenv api_address;go
${kernel_addr_r}"
CONFIG_CC_OPTIMIZE_LIBS_FOR_SPEED=y
CONFIG_CC_OPTIMIZE_FOR_SPEED=y
CONFIG_ARCH_FIXUP_FDT_MEMORY=n
CONFIG_CC_OPTIMIZE_FOR_SIZE=n
CONFIG_BOOTSTD_BOOTCOMMAND=n
CONFIG_LEGACY_IMAGE_FORMAT=n
CONFIG_SYS_DEVICE_NULLDEV=n
CONFIG_OF_LIBFDT_OVERLAY=n
CONFIG_CMD_BLOCK_CACHE=n
CONFIG_TOOLS_LIBCRYPTO=n
CONFIG_CMDLINE_EDITING=n
CONFIG_CMD_VIDCONSOLE=n
CONFIG_SYSINFO_SMBIOS=n
CONFIG_TOOLS_KWBIMAGE=n
CONFIG_USB_HOST_ETHER=n
CONFIG_OF_BOARD_SETUP=n
CONFIG_AUTO_COMPLETE=n
CONFIG_SYSINFO_EXTRA=y
CONFIG_ISO_PARTITION=n
CONFIG_EFI_PARTITION=n
CONFIG_BOOTM_VXWORKS=n
CONFIG_BOOTM_NETBSD=n
CONFIG_CMD_BOOTFLOW=n
CONFIG_SYS_LONGHELP=n
CONFIG_CMD_FS_UUID=n
CONFIG_CMD_SETEXPR=n
CONFIG_USB_STORAGE=n
CONFIG_CMD_CONSOLE=n
CONFIG_BOOTM_LINUX=n
CONFIG_CMD_EDITENV=n
CONFIG_BOOTM_PLAN9=n
CONFIG_BOOTM_RTEMS=n
CONFIG_USE_PREBOOT=n
CONFIG_CMD_SAVEENV=n
CONFIG_CMD_PINMUX=n
CONFIG_VIDEO_LOGO=n
CONFIG_BOOTDELAY=-2
CONFIG_SYS_XTRACE=n
CONFIG_CMD_MEMORY=n
CONFIG_CMD_RANDOM=n
CONFIG_CMD_SOURCE=n
CONFIG_CMD_BOOTD=n
CONFIG_CMD_BOOTM=n
CONFIG_CMD_LOADS=n
CONFIG_CMD_LOADB=n
CONFIG_CMD_CRC32=n
CONFIG_CMD_ITEST=n
CONFIG_CMD_SLEEP=n
CONFIG_CMD_XIMG=n
CONFIG_CMD_GPIO=n
CONFIG_CMD_ECHO=n
CONFIG_CMD_ELF=n
CONFIG_CMD_IMI=n
CONFIG_CMD_RUN=n
CONFIG_CMD_FDT=n
CONFIG_CMD_I2C=n
CONFIG_CMD_CLS=n
CONFIG_CMD_DM=n
CONFIG_EXPERT=n
CONFIG_GZIP=n
CONFIG_NET=n
CONFIG_LTO=y
CONFIG_API=y
CONFIG_SYS_DCACHE_OFF=y
CONFIG_SYS_ICACHE_OFF=y
CONFIG_NO_FB_CLEAR=y
CONFIG_VIDEO_ANSI=y
This shrink the U-Boot binary by a factor of two and the boot
process is now very fast (~3s), most of the wait time is the RPI
own boot process and U-Boot USB scan.
What does it do ? It remove a lot of unused commands and bits,
remove U-Boot logo, set the boot delay, disable network, enable
API, remove unused stuff such as USB storage / Ethernet and run my
OS without looking for the boot.scr file to speed the boot
process, it also show the api_address variable which is
handy for API usage. It also enable ANSI escape
codes which is useful to control the text cursor etc. (see
this to see how U-Boot handle ANSI)
There is some more speed / size improvements by disabling
console if ones is willing to lose it with
CONFIG_DISABLE_CONSOLE=y. (you may not want to do that in the early
OS steps !)
For a faster PI boot process i also added these lines in
config.txt (note : i just use HDMI and USB on my PI) :
kernel=u-boot.bin

disable_splash=1

boot_delay=0

enable_uart=0

camera_auto_detect=0

display_auto_detect=0

force_eeprom_read=0

ignore_lcd=1

disable_touchscreen=1

disable_fw_kms_setup=1

disable_poe_fan=1

auto_initramfs=0

force_turbo=0

initial_turbo=10
Note that i disabled the ARM instruction cache and data cache
on purpose due to mandatory cache maintenance (invalidation) on ARM
because they operate independently (Harvard
architecture which started from ARMv4), this means additional
code to take care of this abstraction for dynamically generated
code and so on, this may introduce difficult to debug side effects
so disabling it was a development safety mechanism, i later enabled
it again when the code was settled on, main disadvantage of
disabling cache is reduced performances.
U-Boot has some commands (dcache and icache)
which can be used to flush / toggle CPU caches, these commands are
enabled by CONFIG_CMD_CACHE=y and it might be useful in some
case to flush the caches before the go commands, cache
maintenance may also depends on U-Boot MMU
setup (exception is if the loaded program has its own setup) so it
may be safer to do cache maintenance through U-Boot internals, a
simple way to do this is to extend the U-Boot API with cache
maintenance functions. (see below)
U-Boot exported functions usage
doc/README.standalone and the standalone
U-Boot example show usage of U-Boot exported functions which is
some kind of internal API that is especially handy for quick access
to keyboard / timer, the stubs.c file is especially
interesting, it show code for many platforms to directly call an
U-Boot exported function from assembly. U-Boot follow the
ARM Embedded ABI (EABI) calling convention (same for API btw)
:
On ARM, the following registers are used:

        R0:     function argument word/integer result
        R1-R3:  function argument word
        R9:     platform specific
        R10:    stack limit (used only if stack checking is enabled)
        R11:    argument (frame) pointer
        R12:    temporary workspace
        R13:    stack pointer
        R14:    link register
        R15:    program counter

    ==> U-Boot will use R9 to hold a pointer to the global data

    Note: on ARM, only R_ARM_RELATIVE relocations are supported.
The standalone example code in stubs.c use the U-Boot
global data pointer stored in R9 on ARM (this is the
global_data struct in
include/asm-generic/global_data.h) plus some computed offset to
locate the jump table (struct jt member) which contains
pointers to exported functions, it then call functions stored in
that table.
R9 should never be modified when exported functions are used,
U-Boot might use the global data pointer within the calls ! It
should be saved somewhere and loaded before an exported function
call. This should perhaps be applied to most critical registers as
well such as SP if modified although it worked fine with just R9 on
this particular case.
A list of supported functions is available in the file
include/_exports.h.
A simple ARM example to use U-Boot getc() looks like
this :
.global _start


_start:

    // U-Boot exported function call (for bigger
programs: r9 should be saved somewhere and restored before calling
an exported function)

    adr lr, halt // return to "halt" after getc
call

    ldr ip, [r9, #124] // load jump table address
(global data pointer is in r9 + offset to the *jt* member)

    ldr pc, [ip, #4] // call getc, result in r0

    //


halt:

    wfe

    b halt
Note : The jt offset may change with
different U-Boot config. options so in real use case a constant
might be appropriate, in C this offset is computed in stubs.c, it can also be inferred directly by looking at the
global_data struct.
To compile this code (and other code here) with GCC
:
arm-linux-gnueabihf-as
-march=armv6 getc.s -o getc.o

arm-linux-gnueabihf-ld -Ttext=0x80000 getc.o -o getc.elf

arm-linux-gnueabihf-objcopy getc.elf -O binary
getc.bin
Note : -march= argument is important and is set
to match the target CPU architecture, if not specified some
instructions may be generated that are not supported by the early
PI.
Also note the -Ttext=0x80000 ld argument which should
reflect the value of kernel_addr_r U-Boot environment
variable on the PI Zero, this address is the location of the
program in RAM after the fatload U-Boot command run, this
value was chosen by the default U-Boot configuration on 32-bit
Raspberry PI because it is the default load / start address on this
RPI. It may be different on 64-bit RPI or other boards. Precise
reason for this address may be due to a safe convention since the
lowest RAM area may be used by the firmware.
U-Boot API usage
The U-Boot API (see U-Boot examples/api/) has
more features than the exported functions and it is easier to hack
on, it is slightly harder to use in assembly (very easy in C though
!) but is safer, it allow storage / network access.
The function syscall defined in api/api.c needs to be called in order to use it, this
function address is exposed in the syscall field of
api_signature structure defined in include/api_public.h, this structure address is known after
boot by looking at the value of the api_address U-Boot
environment variable.
All the available API functions are defined in
include/api_public.h
Just like the safety tips mentioned for the
standalone API, R9 (at least) should be saved somewhere and loaded
before the calls to ensure correct behavior since it hold the
U-Boot context and may be used within the calls.
Difference with standalone API is that the arguments
are addresses.
Here is a U-Boot API example which call getc() then
putc(), this get keyboard input and output it right
away :
.global _start


.equ UBOOT_API_ADDRESS, 0x1bba50d0 // "api_address" U-Boot
environment variable value; printenv api_address


_start:

    shell:

        ldr r4,
=UBOOT_API_ADDRESS

        mov r0, #1 // U-Boot
syscall number (getc)

        mov r1, #0 // retval
argument (addr. where return value is stored; useful for a few
functions (device ones) but is mandatory even if unused

        add r2, sp, #4 //
address of getc returned value; will be on stack in this case

        mov lr, pc

        ldr pc, [r4, #16] //
call syscall(1, 0, &v) where &v is value of r2


        mov r0, #2 // putc

        mov r1, #0 // retval

        add r2, sp, #4 // give
the address of the character returned by getc as second
argument

        mov lr, pc

        ldr pc, [r4, #16] //
call syscall(2, 0, &v)


        wfe

        b shell
Note : api_address may change with
U-Boot config. change, it change when i modify CONFIG_BOOTCOMMAND in my case which is why i always print
the API address environment variable after boot in case of a
config. change. A better way to do it is shown in the U-Boot API C
demo which scan a location in memory to find the structure address
through its signature, it is way more robust than using a
constant.
tstc() function can be used before a call to getc() to check for inputs. (e.g. non blocking inputs)
A full / clean ARMv6 implementation of a generic U-Boot API
routine is available here
Extending the U-Boot API
Extending the U-Boot API is done by modifying
include/api_public.h and api/api.c, it can be useful
to expose some of the U-Boot internals / commands (see U-Boot
cmd directory) to our ARM program, i will show a simple
example that will add a way to flush the ARM data cache :
- add API_DCACHE_FLUSH before API_MAXCALL in the enum found in include/api_public.h
- add
#include <cpu_func.h>in api/api.c so we can use the flush_dcache_all function - extends the calls_table in
api/api.c by adding this line :
calls_table[API_DCACHE_FLUSH] =
&API_dcache_flush;
Then the API_dcache_flush function can be implemented
in the same file, it is a simple call to the internal U-Boot
flush_dcache_all function (this information was found by
looking at the command code cache.c in cmd directory)
:
static int API_dcache_flush(va_list
ap) {

    flush_dcache_all();

    return 0;

}
The function is now exposed to our program through the U-Boot
API.
Note that there is precise cache maintenance methods
such as flush_dcache_range / invalidate_dcache_range
or mmu_set_region_dcache_behaviour (require
#include <asm/cache.h>) to do cache maintenance or set
cache behaviors for a specific range :
mmu_set_region_dcache_behaviour(ALIGN_DOWN((uintptr_t)start,
MMU_SECTION_SIZE), ALIGN((uintptr_t)size, MMU_SECTION_SIZE),
DCACHE_OFF);
Here is a generic cache maintenance function that should be
flexible enough for most situations :
static int API_cache_care(va_list
ap)
{
int care_type;
care_type = va_arg(ap, int);
if (care_type == 1) {
flush_dcache_all();
} else if (care_type == 2) {
invalidate_dcache_all();
} else {
flush_dcache_all();
invalidate_dcache_all();
invalidate_icache_all();
}
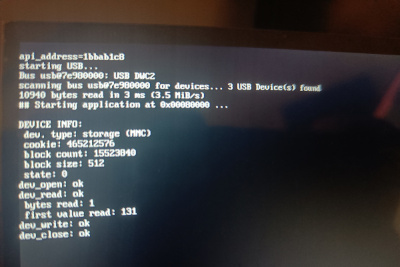
}U-Boot storage / network access
U-Boot API (see above) must be used for storage and network
device access, they are handled with the same set of
functions.
It is slightly more complicated to use in assembly compared to
other functions since it use a device_info structure (see
include/api_public.h) that must be passed around :
- fill device_info structure with a call (or multiple
calls depending on device you want to get) to API_DEV_ENUM
(api/api.c), check the result (device type, block count and
size for the storage case)
- pass the structure address to API_DEV_OPEN and check for return value
- pass the structure address to API_DEV_READ or API_DEV_WRITE with the parameters you want, also check for return value (and # of blocks read) in case anything wrong happen
- eventually pass the structure address to API_DEV_CLOSE
In storage case the API is a low level blocks
based access (raw so it is not filesystem aware !) so in the
case of write you give a buffer to read from, a starting block and
a number of blocks to write. (see api/api.c)
The devices enumerated with enum are the devices that were
scanned at boot by U-Boot, a rescan may be possible by switching
back to U-Boot (or poke into U-Boot internals ?) but is out of
scope for this article.
For my needs on a RPI Zero with a single MMC device i just use
a SD card with a small partition that is used to store the boot
stuff (binaries) and directly use the unpartitioned space of the SD
as blocks storage, this is how colorForth
environment works for example, this is the simplest way to store
and read data without fuss on a storage device. An useful command
and software to works in an interoperable way or experiment with
this (on Linux) is wxHexEditor and parted
(following command show device /dev/sdg layout details in
bytes) : sudo parted /dev/sdg unit B print
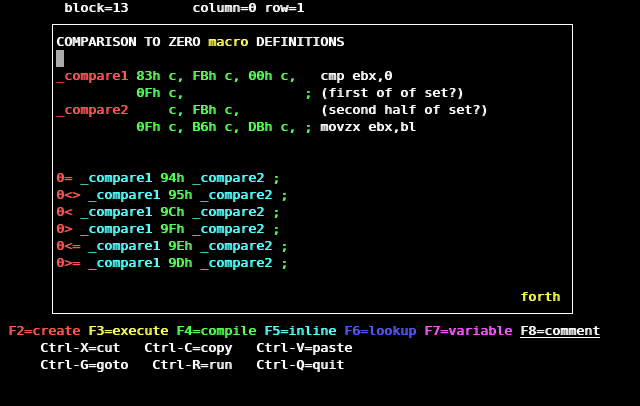
Here is a full example with my custom ARM Forth language. (also
see api.inc and gnos.th)
raw MMC access with U-Boot on RPI Zero 1.3
(example done with my custom ARM Forth)
U-Boot frame-buffer access (graphics)
Graphics
on the PI 0 is actually easy to do at low level but U-Boot
provide this already... wasn't worth to write an
implementation.
Modifying frame-buffer values (plotting pixels) require to
know where the frame-buffer is in memory, this can be done with
bdinfo U-Boot command which show the
frame-buffer address at "FB base" and size at "FB
size".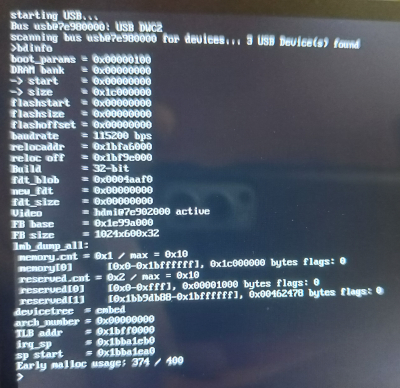
U-Boot bdinfo command output with
several memory layout info, "FB base" is where you poke to change
pixels value
Here is a bare metal ARM example of filling
(clearing) the screen by accessing the U-Boot frame-buffer :
.global _start


@ fill 1024x600x32 frame-buffer with white color

_start:

    ldr r0,
[pc]
@ load FB base into r0

    mov pc, pc

    .word
0x1e99a000         @ FB
base

    mov r2, #(1024 * 600)

    0:

        mov
r1,#0x00ffffff   @ white

        str r1, [r0],
#4     @ modify pixel value to white

        subs r2, #1

        bne 0b

    0:

        b 0b
Note that graphics stuff may have performance issues using
U-Boot framebuffer since it is way more limited than accessing the
GPU directly. (there is no notion of double buffering etc.)
An easy way to flip buffers on RPI 0 is to use the mailbox CPU
/ GPU interface, it can be quickly integrated with the U-Boot
initialized framebuffer by doubling the vertical virtual resolution
at initialization by patching bcm2835_set_video_params in
arm/mach-bcm283x/msg.c :
msg_setup->virtual_w_h.body.req.height = (*heightp)
* 2;
This will change FB base and extend the framebuffer with an
offscreen buffer, the displayed buffer part (virtual offset) can
then be changed in our program by using the mailbox interface. An
easier 100% U-Boot alternative is to directly extends the U-Boot
API with a function that set the virtual offset. (see arm/mach-bcm283x/msg.c)
Here is an accelerated double buffering example in my Forth, it
use the U-Boot framebuffer with the patch above + custom mailbox
interface code, VSync
is done roughly with a timer.
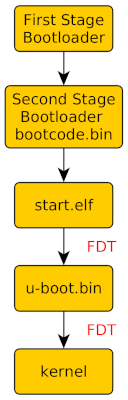
Note on U-Boot memory
layout
U-Boot load at 0x00008000 on the PI 0 and
relocate itself to the end of the available RAM after boot, our
program load at 0x00080000 which means that the RAM between
our program address and U-Boot relocation address is free to use
minus some margin (due to stack being there as well), the
relocation address and details can be checked with
bdinfo U-Boot command.Note that U-Boot memory footprint is tiny, it use ~32KB of RAM
in my case with the custom config above.
You might have noticed that the DRAM bank size value is 448MB
in the screenshot above, the PI 0 has 512MB so why 448 ? Reason is
shared memory, the GPU take 64MB of RAM by default ! (can be
changed in config.txt)
U-Boot USB keyboard handling
U-Boot default keyboard layout is an US one due to USB HID,
this can be changed later in our custom OS or U-Boot keyboard
handling can be hijacked in U-Boot common/usb_kbd.c
adding this code for example to usb_kbd_translate function
(excerpt of a french layout support) :
if (scancode == 4) scancode = 0x14;
// A -> Q

else if (scancode == 0x14) scancode = 4; // Q -> A

else if (scancode == 0x1a) scancode = 0x1d; // W -> Z

else if (scancode == 0x1d) scancode = 0x1a; // Z ->
W
Keys state (and LEDs) can also be changed in this file to boot
in uppercase etc. (data->flags ^= USB_KBD_CAPSLOCK; in
usb_kbd_probe_dev function)
I initially investigated U-Boot keyboard handling code due to
a faulty Raspberry PI keyboard, some keypress 't' and 'y' were also
outputting another character prior it so i had to find a way to
patch this in U-Boot by adding this code to
usb_kbd_irq_worker function :
    // Check for
problematic key combinations in the report

    for (i = 2; i < USB_KBD_BOOT_REPORT_SIZE - 1;
i++) {

        if ((data->new[i] ==
0x15 && data->new[i + 1] == 0x17) || // Check for 'r' (0x15)
followed by 't' (0x17)


(data->new[i] == 0x18 && data->new[i + 1] == 0x1C)) { //
Check for 'u' (0x18) followed by 'y' (0x1C)


// Keep next char, drop first


data->new[i] = data->new[i + 1];


data->new[i + 1] = 0;

        }

    }
Change frame-buffer
resolution (RPI 0)
My display is a cheap 7" HDMI display bought on Amazon with a
max resolution of 1024x600, for some reasons the frame-buffer was
set to 656x512 by default, an adjustment was made to the file
config.txt to allow full resolution :
disable_splash=1

boot_delay=0

enable_uart=0

camera_auto_detect=0

display_auto_detect=0

force_eeprom_read=0

ignore_lcd=1

disable_touchscreen=1

disable_fw_kms_setup=1

hdmi_group=2

hdmi_mode=87

hdmi_cvt=1024 600 60 6 0 0 0

hdmi_drive=1
See
Raspberry PI config.txt video documentation for the details
about the added lines, this select a 1024x600 60Hz DMT 15:9 monitor
mode, these lines were actually found in the device user
manual.
Debugging ARM / U-Boot
code
U-Boot patch to keep debugging information on screen
U-Boot takes care of setting up the CPU interrupts, it shows
some helpful information by default when a CPU exception is
triggered such as undefined instruction, the issue is that
it also reset the CPU and reboot, the information then vanish
since i don't use a serial interface and the display don't keep the
information when the device is off...
There is unfortunately no ways to tell U-Boot to not reboot on
an exception so there is two software solutions : patch U-Boot code
or
setup own interrupts which would be the robust way but involve
additional code to redo what U-Boot exception handlers
does.
A quick solution was to patch U-Boot code by editing
arch/arm/lib/interrupts.c file and replacing
bad_mode function code with an infinite loop
: while (1) ; then rebuilding U-Boot, this
way the information stay on screen and no reboot
happen. Immediate advantage is that U-Boot exception handlers are used
so i can just trigger an invalid instruction exception with
udf in my program and U-Boot will report the CPU state
right away, there is no additional code involved although there is
a major downside...Restoring U-Boot
context on an exception
The previous trick might work when the U-Boot context
(registers state) is left unchanged in our program but U-Boot
exceptions might not work anymore when critical registers (such as
R9) in those exceptions are modified by our program. This is the
same issue as the API usage mentioned earlier.
The way to fix this might be to wrap U-Boot exception handlers
with some code that restore the U-Boot context then jump to the
original handlers, i tried this at first, it didn't works for some
reasons, i don't know if some restriction features (such as
MMU
etc.) got in the way but U-Boot never seemed to jump to my code
even though the jump address was correct and the handler was
effectively wrapped without errors, it just crashed with a data
abort instead of the replaced undefined instruction
exception handler i was testing on.
A quick fix that worked was to hack the U-Boot exception code
to make it jump at my routine, this routine just restore the U-Boot
context (R9) and is placed at 0x80008 after U-Boot API setup code
(setup code save SP and R9 in my case), this is a bit ugly as it
tie (2-way) U-Boot code with the program code... but i considered
it okay anyway since it is a single isolated macro.
Setting up
custom interrupts and associated debug routines (print etc.)
would be the robust way to handle this.
Here is the macro that was added to
arch/arm/lib/vectors.S : .macro
restore_uboot_ctx
str lr,
[pc] @ save LR
mov pc,
pc @ skip
next
.word
0
@ LR is saved here
add lr, pc, #4 @
prepare jump
ldr pc, [pc, #-4] @ jump to routine
address
.word 0x00080008 @ address of
the 'restore uboot gd' routine in user program
ldr lr, [pc, #-24] @ restore LR
.endmThis macro is then called just before the bl
instruction in each exception handlers located at the end of the
same file. Note that i didn't test the SWI handler as i don't use
it, it works differently and may require adaptation.
Here is a program starting code sample placed at
0x80000 :
.global _start

_start:

    bl UBOOT_API_SETUP

    b 0f

       uboot_restore_gd: @ called by
the U-Boot patch

           adr
r9, uboot_gd_addr

           ldr
r9, [r9]

           mov
pc, lr

       uboot_gd_addr: @ U-Boot
global_data struct address is stored here

           .word
0

       uboot_sp_addr: @ U-Boot stack
address is stored here

           .word
0

       UBOOT_API_SETUP: @ routine to
save U-Boot context

           adr
r0, uboot_gd_addr

           str
r9, [r0] @ save global_data struct address in r9 when program is
launched from U-Boot (with "go" command)

           adr
r0, uboot_sp_addr

           str
sp, [r0] @ save U-Boot SP

           mov
pc, lr

    0:

@ ... program code ...
General tips
Most of the ARM development was done with the help of an
ARMv7 simulator to
iterate quickly since i don't use
UART / serial interface on the PI. (i just swap the SD
card)
To debug on cpulator
i usually import the whole code since it is simple enough to
combine manually, i can then debug step by step in cpulator and the
disassembly view has all labels so this help a lot, for quick
debugging i just import the binary at 0x80000 and use this code to
jump in :
.global _start

_start:


ldr r0,[pc]

mov pc,r0

.word 0x80000
Although very helpful the simulator is often not enough on
real hardware since many interfering things may happen (cache etc.)
so i have a set of 32 bits debug routines to print RAM content,
U-Boot bundled tools could be used directly by returning to the
prompt also, the best way to debug though (may be costly) would be
with a JTAG
device.
Here are the ARM debug routines implemented as macros, they
are highly non portable, only works on 32-bits ARM architecture
in non thumb mode, require adaptation otherwise since it
manipulate PC directly :
@ a set of standalone debug code

@ use with caution due to direct

@ PC manipulation (no labels)

@ uboot API putc

.macro putc c

    push {r0}

    mov r0, #\c

    putrc r0

    pop {r0}

.endm


@ uboot API putc with register

.macro putrc r

    push {r0-r12, lr}

    mov r3, \r

    mov r1,
#0
@ retval

    str r3, [pc, #8]

    ldr r5, [pc]

    add pc, #4

        .word
0x1bbab1c8        @ api address
(change to yours)

        .word
0
@ value (is replaced)

    sub r2, pc,
#12
@ value address

    mov r0,
#2
@ PUTC

    mov lr, pc

    ldr pc, [r5, #16]

    pop {r0-r12, lr}

.endm


@ print memory area per 32b word

.macro print_mem4 start end

    push {r0-r12, lr}

    ldr r2, [pc, #8]

    ldr r1, [pc]

    add pc, #4

        .word \start

        .word \end

    ldr r0, [r1], #4

    print_hex r0

    putc ' '

    cmp r1, r2

    suble pc, pc, #196

    pop {r0-r12, lr}

.endm


@ print reg. hexadecimal value

.macro print_hex r

    push {r1, r2,
r3}           @
save registers

    mov r0, \r

    mov r1,
pc
@ load the address of hex digits string

    add pc, #12

        .ascii
"0123456789ABCDEF"

    mov r2,
#28
@ 32 bits, 8 hex digits, so we start at 28 (7th nibble)

        mov r3, r0

        lsr r3,
r2
@ shift the desired nibble to the least significant position

        and r3, r3,
#0xf        @ mask to get only 4
bits (1 nibble)


        ldrb r3, [r1,
r3]       @ load the corresponding
hex character from the table

        putrc r3


        subs r2,
#4
@ move to the next nibble (4 bits less)

        subpl pc, pc,
#80       @ loop until all nibbles
are printed

    pop {r1, r2,
r3}
@ restore registers

.endm
What is next ?
With a
functional Forth prototype and all U-Boot bare metal I/O
examples now in place, the logical next step is to proceed with a
Forth dialect ARM implementation.
back to top
